Minute Snow Ice Cream: Your Easy 4-Ingredient Winter Treat
As winter blankets the world in a pristine white, a unique culinary opportunity often arises: the chance to transform freshly fallen snow into a delightful, homemade dessert. Forget the long churning times and complex recipes of traditional ice cream; this enchanting treat, known simply as snow ice cream, is a magical, easy 4-ingredient winter treat that comes together in mere minutes. Perfect for a cozy snow day, this whimsical dessert captures the fleeting beauty of winter in a sweet, refreshing bite. This article will guide you through creating your own Minute Snow Ice Cream, detailing two simple methods – one featuring sweetened condensed milk for ultimate convenience, and another utilizing everyday milk and sugar for when SCM isn't on hand. We’ll also cover essential tips for safely collecting snow, understanding how different snow types impact texture, and even how to salvage a batch if it gets a little too soupy. Get ready to turn a snowy afternoon into a cherished memory with this wonderfully simple and utterly delicious creation.The Enchantment of Snow Ice Cream: A Winter Wonderland in a Bowl
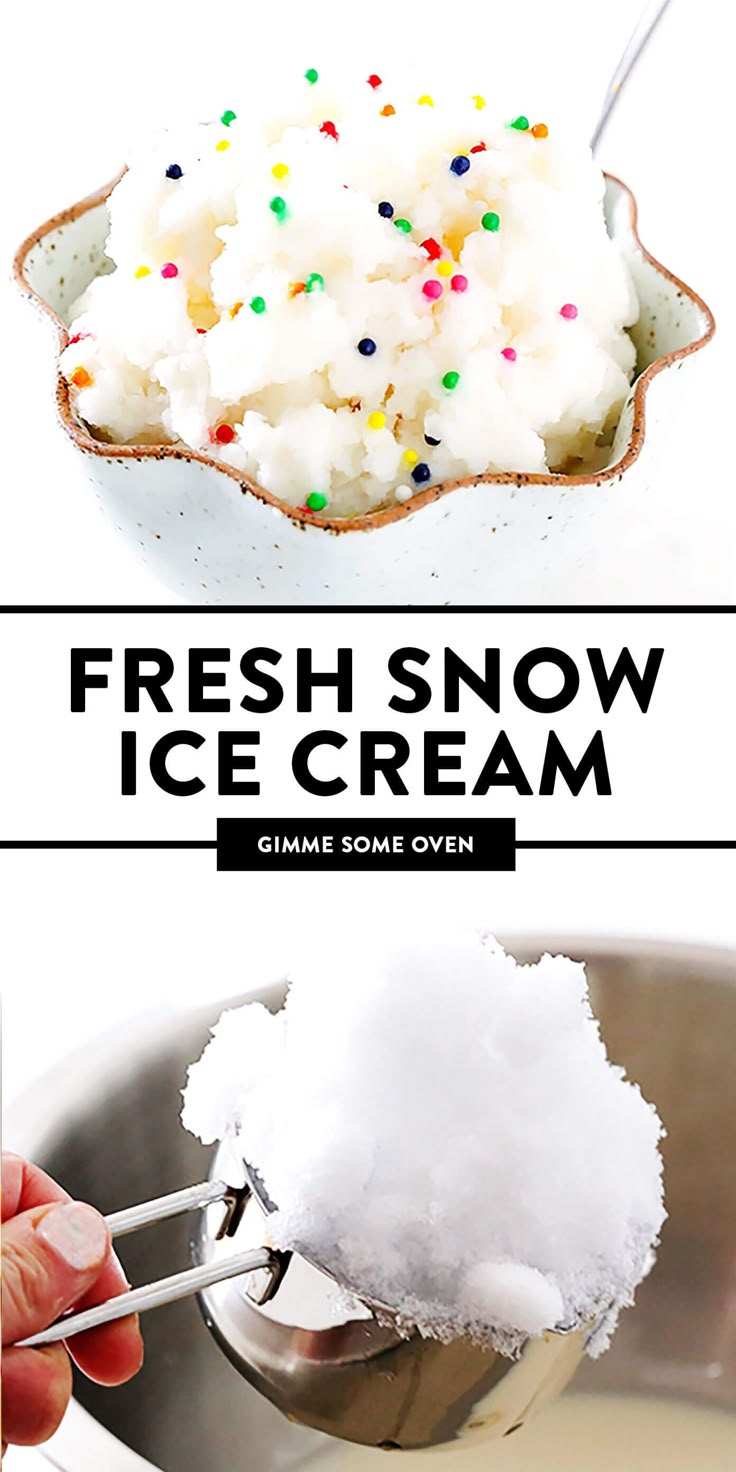
At its heart, snow ice cream is a celebration of nature's bounty and culinary simplicity. It's a whimsical nod to childhood, evoking memories of playful snow days and the wonder of transforming a natural element into something sweet and delicious. Often called "snow cream" or even "snow monkey ice cream," this isn't your typical rich, creamy, slow-churned dessert. Instead, imagine a delightful hybrid – a bit like a granita, a snow cone, or perfectly shaved ice. Its texture is lighter, icier, and incredibly refreshing, offering a unique sensory experience that a store-bought pint simply cannot replicate. The beauty of snow ice cream lies not just in its taste, but in the experience of making it. It’s an interactive, family-friendly activity that turns a cold, snowy day into a creative kitchen adventure. It teaches children (and reminds adults!) that the most memorable treats can sometimes be the simplest, born from a pinch of imagination and a touch of nature's magic. While its fleeting nature means it melts quickly, that ephemeral quality is part of its charm, making each scoop a special, seasonal indulgence.Gathering Nature's Sweetest Ingredient: Snow Collection & Safety
The most crucial ingredient for your Minute Snow Ice Cream is, of course, the snow itself. But not all snow is created equal, especially when it comes to safe consumption. Taking a few precautions will ensure your winter treat is not only delicious but also worry-free.Safety First: Selecting Your Snow
When harvesting snow for consumption, cleanliness is paramount.- Fresh is Best: Always opt for freshly fallen snow. It's less likely to have accumulated environmental debris or contaminants.
- The "Yellow Snow" Rule: This childhood adage holds true for a reason – absolutely avoid any discolored snow.
- Undisturbed Locations: Collect snow from areas that haven't been disturbed by foot traffic, pets, or vehicle exhaust. Ideal spots include the middle of a freshly fallen drift in your yard, atop a clean deck railing, or even from a large, clean bowl placed outside to collect falling flakes.
- Away From Runoff: Steer clear of snow collected near rooftops (which can contain chemicals from shingles or gutter debris) or roadsides (which are exposed to pollutants, salt, and de-icing agents).
- Consider Your Environment: If you live in a highly urbanized area with significant air pollution, you might consider foregoing homemade snow ice cream or waiting for a particularly pristine snowfall. For more in-depth advice on safe snow collection and other valuable insights, be sure to check out our guide on Mastering Snow Ice Cream: Tips for Texture, Safety & Flavor.
Understanding Snow Types for Optimal Texture
Just as different flours create different baking results, the type of snow you collect will influence the final texture of your snow ice cream.- Fluffy, Powdery Snow: This light, dry snow, often seen in colder temperatures, will yield a more granular, icier result, similar to a granita or authentic shaved ice. It offers a wonderfully refreshing crunch.
- Wet, Heavy Snow: When temperatures hover around freezing, snow tends to be wetter and heavier. This type of snow will produce a creamier, denser consistency for your ice cream, more akin to a soft-serve texture.
Two Paths to Deliciousness: The 4-Ingredient Core Recipe
The beauty of Minute Snow Ice Cream lies in its simplicity. With just a handful of ingredients, you can conjure up a delightful treat. Here, we outline the two most popular methods.Method 1: The Sweetened Condensed Milk Magic
This is arguably the easiest and most common approach, thanks to the inherent sweetness and creaminess of sweetened condensed milk (SCM).Ingredients:
- Approximately 16 cups (or a very large bowlful) of fresh, clean snow
- 14 ounces (one standard can) sweetened condensed milk
- 2 teaspoons vanilla extract
- A generous pinch of fine sea salt
Sweetened condensed milk is a pantry hero for this recipe. It's essentially evaporated milk combined with a high sugar content, providing both the desired sweetness and a creamy base without needing additional sugar or much stirring. The vanilla extract is non-negotiable – without it, you'd simply have sweet snow. High-quality vanilla will truly elevate the flavor. And then there's salt, the unsung hero. A pinch of fine sea salt serves a dual purpose: it dramatically enhances the sweetness and vanilla notes, and fascinatingly, it depresses the freezing point of the mixture, helping to keep your snow ice cream colder for longer, slowing down the melting process.
Method 2: The Pantry Staple Swap (Milk & Sugar)
Don't have sweetened condensed milk on hand? No problem! You can easily achieve a delicious snow ice cream using regular milk and sugar.Ingredients:
- Approximately 16 cups (or a very large bowlful) of fresh, clean snow
- 1.5 cups milk (any kind – whole, skim, or even a non-dairy alternative like almond or oat milk works)
- 1/2 to 3/4 cup granulated sugar (adjust to your sweetness preference)
- 2 teaspoons vanilla extract
- A generous pinch of fine sea salt
To use this method, simply whisk together the milk, sugar, vanilla, and salt until the sugar is fully dissolved before adding it to the snow. This method gives you a bit more control over the sweetness level. For more details on this alternative and troubleshooting tips, consult our article: No SCM? How to Make Snow Ice Cream + Fix Soupy Sadness.
The Essential Role of Vanilla (and Beyond!)
Vanilla extract is the soul of this snow ice cream. Without its warm, aromatic notes, the dessert would simply taste like sweet, cold snow. However, don't limit yourself! This recipe is a fantastic canvas for other flavor explorations:- Almond Extract: For a delicate, nutty twist.
- Peppermint Extract: Perfect for a festive holiday feel.
- Cocoa Powder: Whisk in a few tablespoons with your liquid base for a chocolate snow ice cream.
- Fruit Purees: A swirl of raspberry or strawberry puree can add vibrant color and natural fruitiness.
- Coffee Extract: For a subtle coffee-flavored treat.
Whipping Up Your Winter Wonder: Step-by-Step Guide & Pro Tips
Ready to transform that fresh snow into an irresistible dessert? Here's how to do it quickly and efficiently.The Quick Mix: From Snowdrift to Dessert
1. Prepare Your Base: In a very large mixing bowl (bigger than you think you’ll need!), combine your liquid ingredients (either sweetened condensed milk, vanilla, and salt OR the milk, sugar, vanilla, and salt mixture). Whisk until well combined. 2. Gather Your Snow: Quickly scoop approximately 16 cups of clean snow into the large bowl with your liquid base. Don't worry if it's not exact – a little more or less is fine. 3. Stir, Stir, Stir: This is the key step. Using a sturdy spoon or spatula, stir the snow and liquid mixture together thoroughly. It will take a few minutes and require some patience. The goal is to fully coat all the snow evenly, resulting in a slushy, yet unified, consistency. Don't expect it to become thick and creamy like traditional ice cream; remember, we're aiming for a granita-like texture. 4. Work Fast: Snow melts! Especially indoors. Plan to serve immediately to enjoy it at its best.Troubleshooting: Avoiding Soupy Sadness
Sometimes, despite your best efforts, your snow ice cream might end up a bit too watery. Don't fret – it's fixable!- If Too Watery: If your mixture gets too soupy before serving, simply place the bowl in the freezer for about 30 minutes. Give it another quick stir before scooping, and it should firm up nicely.
- If Too Thick: If you've added too much snow or prefer a looser consistency, gradually stir in a splash more regular milk until you reach your desired texture.
Optimizing the Experience: Making it Outdoors
One delightful tip, especially if you have young children who love to "dilly dally," is to actually prepare your snow ice cream outdoors. The ambient cold air will significantly slow down the melting process, giving you and your family more time to mix, enjoy, and truly savor the experience without rushing.The Grand Finale: Toppings & Presentation
Once your Minute Snow Ice Cream is perfectly mixed, it’s time for the fun part: serving and decorating! Scoop the slushy delight into individual bowls, and then let your imagination run wild with toppings.Some popular and festive ideas include:
- Colorful sprinkles
- Chocolate syrup or hot fudge
- Caramel sauce
- A dollop of whipped cream
- Fresh fruit (berries or sliced bananas work wonderfully)
- Crushed candy canes or other holiday candies
- Mini chocolate chips
- Toasted coconut flakes
